Check out my pattern for a new bracelet as part of my LoVe Series for Valentine's Day!
Click Here to watch my tutorial!
Click Here to watch my tutorial!
Bubble Heart Fishtail Bracelet for the Rainbow Loom (Advanced)
By: Darling Craftolate
Set up:
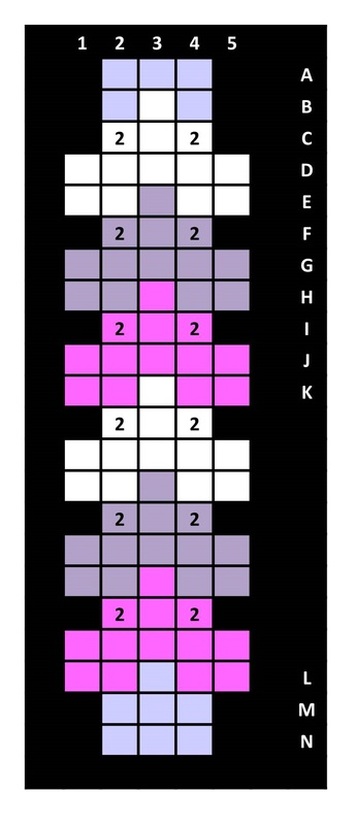
Two peg bars with 5 spaces in between supports, not staggered and arrows facing right. The sets of pegs (the one in the front and the one directly behind it) are numbered 1-5 from the left to the right as displayed in the chart.
Supplies
Recommend crochet hook or metal hook
3 C-clips are needed
Rainbow Loom set up as stated above.
Rainbow Loom elastics (for amount see below)
All elastics are capped (one elastic doubled up) except a horizontal elastic placed across 5 pegs.
Measurements
1 Heart approx. 1.5 cm
Sample Colors
Light Purple Clear: Beginning, horizontal elastics & end.
White, Dark Purple & Pink: Alternating heart colors
Elastics needed for 6 heart sample:
102 (17 for each heart)
32 (20 horizontal elastics & 12 for the beginning & end)
Add 17 for each additional heart + 3 horizontal
Legend
XXX: Horizontal elastic over front 2, 3 & 4 pegs
XXXXX: Horizontal elastic over front 1, 2, 3, 4 & 5 pegs
W/O: work over by lifting the bottom elastics over the peg and top elastics & into the middle (be sure to always work inside horizontal elastics and to grab all the elastics that were on the peg before the last horizontal elastic placed)
H/O: Bring bottom horizontal elastic over and into the middle
INC: increase by moving top extra elastics off of sets 2 & 4 of pegs out to 1 & 5.
DEC: decrease by moving outer elastics off of sets 1 & 5 of pegs to sets 2 &4.
EE: Add an extra elastic to sets 1 & 5 pegs and W/O sets 1 & 5 pegs using same color.
Set: Set up elastics according to chart on displayed sets of pegs
Please note:
All elastics are capped (one elastic doubled up) except a horizontal elastic placed across 5 pegs.
Rows C,F & I are done by placing two elastics on sets 2 & 4 of pegs
Please refer to chart for color of elastics placed on each set of pegs. Feel free to use different color combinations as well!
Guide:
Row A: Set with figure-8, XXX
Row B: Set, W/O, XXX
Row C: Set, W/O, H/O, INC, XXXXX
Row D: Set, W/O, H/O, XXX
Row E: Set, W/O, EE, H/O, DEC, XXX
Row F: Set, W/O, H/O, INC, XXXXX
Row G: Set, W/O, H/O, XXX
Row H: Set, W/O, EE, H/O, DEC, XXX
Row F: Set, W/O, H/O, INC, XXXXX
Row J: Set, W/O, H/O, XXX
Row K: Set, W/O, EE, H/O, DEC, XXX
Repeat Rows C to K to desired length ending after either row D, G or J.
Row L: Set, W/O, EE, H/O, DEC, XXX
Row M: Set, W/O, H/O
Row N: Set, W/O, H/O
Move elastics from the back pegs to the front pegs then place C-clips & remove from loom. Tip: Remove the supports and free the front bar before placing the c-clips for easier removal of your bracelet. Stretch out bracelet. Move any horizontal elastics that are showing in the front to the back of the bracelet then stretch out again. Attach c-clips to adjoining elastics on other end of bracelet and you’re done!
Click Here to watch my tutorial!
By: Darling Craftolate
Set up:
Two peg bars with 5 spaces in between supports, not staggered and arrows facing right. The sets of pegs (the one in the front and the one directly behind it) are numbered 1-5 from the left to the right as displayed in the chart.
Supplies
Recommend crochet hook or metal hook
3 C-clips are needed
Rainbow Loom set up as stated above.
Rainbow Loom elastics (for amount see below)
All elastics are capped (one elastic doubled up) except a horizontal elastic placed across 5 pegs.
Measurements
1 Heart approx. 1.5 cm
Sample Colors
Light Purple Clear: Beginning, horizontal elastics & end.
White, Dark Purple & Pink: Alternating heart colors
Elastics needed for 6 heart sample:
102 (17 for each heart)
32 (20 horizontal elastics & 12 for the beginning & end)
Add 17 for each additional heart + 3 horizontal
Legend
XXX: Horizontal elastic over front 2, 3 & 4 pegs
XXXXX: Horizontal elastic over front 1, 2, 3, 4 & 5 pegs
W/O: work over by lifting the bottom elastics over the peg and top elastics & into the middle (be sure to always work inside horizontal elastics and to grab all the elastics that were on the peg before the last horizontal elastic placed)
H/O: Bring bottom horizontal elastic over and into the middle
INC: increase by moving top extra elastics off of sets 2 & 4 of pegs out to 1 & 5.
DEC: decrease by moving outer elastics off of sets 1 & 5 of pegs to sets 2 &4.
EE: Add an extra elastic to sets 1 & 5 pegs and W/O sets 1 & 5 pegs using same color.
Set: Set up elastics according to chart on displayed sets of pegs
Please note:
All elastics are capped (one elastic doubled up) except a horizontal elastic placed across 5 pegs.
Rows C,F & I are done by placing two elastics on sets 2 & 4 of pegs
Please refer to chart for color of elastics placed on each set of pegs. Feel free to use different color combinations as well!
Guide:
Row A: Set with figure-8, XXX
Row B: Set, W/O, XXX
Row C: Set, W/O, H/O, INC, XXXXX
Row D: Set, W/O, H/O, XXX
Row E: Set, W/O, EE, H/O, DEC, XXX
Row F: Set, W/O, H/O, INC, XXXXX
Row G: Set, W/O, H/O, XXX
Row H: Set, W/O, EE, H/O, DEC, XXX
Row F: Set, W/O, H/O, INC, XXXXX
Row J: Set, W/O, H/O, XXX
Row K: Set, W/O, EE, H/O, DEC, XXX
Repeat Rows C to K to desired length ending after either row D, G or J.
Row L: Set, W/O, EE, H/O, DEC, XXX
Row M: Set, W/O, H/O
Row N: Set, W/O, H/O
Move elastics from the back pegs to the front pegs then place C-clips & remove from loom. Tip: Remove the supports and free the front bar before placing the c-clips for easier removal of your bracelet. Stretch out bracelet. Move any horizontal elastics that are showing in the front to the back of the bracelet then stretch out again. Attach c-clips to adjoining elastics on other end of bracelet and you’re done!
Click Here to watch my tutorial!
 RSS Feed
